GM 1983-95 vehicles OBD1 codes self-retrieval
As the name implies, you can get the codes for GM cars or trucks yourself if the model of your vehicle is made before 1995, this means as soon as you see “check engine light” in your dash, you can get the code in minutes if you want.
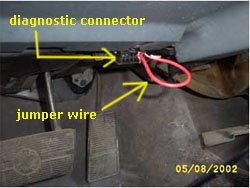
Here is a picture of the connector where you get the code:

When you find the adapter connector, use a jumper wire (see red wire above) and connect terminals A and B. Next turn your key on but don't start. Watch your check engine flash the code/s.
EXAMPLE: CODE 12: one long flash and two short flashesCODE 13: one long flash and 3 short flashes.
Note: code 12 is usually the first code you get and just ignore it.Watch the code after code 12, that's what you need.
GM common codes for OBD1 (for vehicles made before 1995)
12 System normal
13 oxygen sensor circuit open
14 coolant sensor high resistance or shorted
15 coolant sensor circuit low or open
16 direct ignition system (DIS) fault in circuit
17 cam position sensor fault
18 crank or cam sensor error
19 crank sensor circuit fault
21 tps sensor out of range
22 tps sensor signal voltage low
23 intake air temp sensor out of range, low
24 vehicle speed (vss) sensor circuit fault
25 air temp sensor sensor out of range, high
26 quad-driver module (computer) circuit #1 fault
27 quad-driver module (computer) 2nd gear circuit
28 quad-driver module (computer) circuit #2 fault
29 quad driver module (computer) 4th gear circuit
31 cam position sensor fault
32 egr circuit fault
33 map sensor signal out of range, high
34 map sensor signal out of range, low
35 idle air control sensor circuit fault
36 ignition system circuit error
38 brake input circuit fault
39 clutch input circuit fault
41 cam sensor circuit fault, igntion control circuit fault
42 electronic spark timing (EST) circuit grounded
43 knock sensor or electronic spark control circuit fault
44 oxygen sensor lean exhaust
45 oxygen sensor rich exhaust
46 pass-key II circuit or ps.pressure switch circuit fault
47 pcm-bcm data circuit
48 misfire diagnosis
51 calibration error, mem-cal, ecm or eeprom failure
52 engine oil temperature circuit, low temperature indicated
53 battery voltage error or egr or pass-key II circuit
54 egr system failure or fuel pump circuit low voltage
55 a/d converter error or pcm not grounded or lean fuel or frounded reference voltage
56 quad-driver module #2 circuit
57 boost control problem
58 vehicle anti-theft system fuel enable circuit
61 a/c system performance or degraded oxygen sensor signal
62 engine oil temperature high temperature indicated
63 oxygen sensor right side circuit open or map sensor out of range
64 oxygen sensor right side lean exhaust indicated
65 oxygen sensor right side rich exhaust indicated
66 a/c pressure sensor circuit low pressure
67 a/c pressure sensor circuit or a/c clutch circuit failure
68 a/c compressor relay circuit failure
69 a/c clutch circuit head pressure high
70 a/c refrigerant pressure circuit high
71 a/c evaporator temperature sensor circuit low
72 gear selector switch circuit
73 a/c evaporator temperature circuit high
75 digital egr #1 solenoid error
76 digital egr #2 solenoid error
77 digital egr #3 solenoid error
79 vehicle speed sensor (vss) circuit signal high
80 vehicle speed sensor (vss) circuit signal low
81 brake input circuit fault
82 ignition control (IC) 3X signal error
85 prom error
86 analog/digital ecm error
87 eeprom error
99 power management
NOTES:
The above list can be used on most GM vehicles such as Buick, Pontiac, Oldsmobile, Chevrolet and some models of Cadillac. To make sure you have the right code and also fix it, please contact ATS.
Here is a picture of the connector where you get the code:
When you find the adapter connector, use a jumper wire (see red wire above) and connect terminals A and B. Next turn your key on but don't start. Watch your check engine flash the code/s.
EXAMPLE: CODE 12: one long flash and two short flashesCODE 13: one long flash and 3 short flashes.
Note: code 12 is usually the first code you get and just ignore it.Watch the code after code 12, that's what you need.
GM common codes for OBD1 (for vehicles made before 1995)
12 System normal
13 oxygen sensor circuit open
14 coolant sensor high resistance or shorted
15 coolant sensor circuit low or open
16 direct ignition system (DIS) fault in circuit
17 cam position sensor fault
18 crank or cam sensor error
19 crank sensor circuit fault
21 tps sensor out of range
22 tps sensor signal voltage low
23 intake air temp sensor out of range, low
24 vehicle speed (vss) sensor circuit fault
25 air temp sensor sensor out of range, high
26 quad-driver module (computer) circuit #1 fault
27 quad-driver module (computer) 2nd gear circuit
28 quad-driver module (computer) circuit #2 fault
29 quad driver module (computer) 4th gear circuit
31 cam position sensor fault
32 egr circuit fault
33 map sensor signal out of range, high
34 map sensor signal out of range, low
35 idle air control sensor circuit fault
36 ignition system circuit error
38 brake input circuit fault
39 clutch input circuit fault
41 cam sensor circuit fault, igntion control circuit fault
42 electronic spark timing (EST) circuit grounded
43 knock sensor or electronic spark control circuit fault
44 oxygen sensor lean exhaust
45 oxygen sensor rich exhaust
46 pass-key II circuit or ps.pressure switch circuit fault
47 pcm-bcm data circuit
48 misfire diagnosis
51 calibration error, mem-cal, ecm or eeprom failure
52 engine oil temperature circuit, low temperature indicated
53 battery voltage error or egr or pass-key II circuit
54 egr system failure or fuel pump circuit low voltage
55 a/d converter error or pcm not grounded or lean fuel or frounded reference voltage
56 quad-driver module #2 circuit
57 boost control problem
58 vehicle anti-theft system fuel enable circuit
61 a/c system performance or degraded oxygen sensor signal
62 engine oil temperature high temperature indicated
63 oxygen sensor right side circuit open or map sensor out of range
64 oxygen sensor right side lean exhaust indicated
65 oxygen sensor right side rich exhaust indicated
66 a/c pressure sensor circuit low pressure
67 a/c pressure sensor circuit or a/c clutch circuit failure
68 a/c compressor relay circuit failure
69 a/c clutch circuit head pressure high
70 a/c refrigerant pressure circuit high
71 a/c evaporator temperature sensor circuit low
72 gear selector switch circuit
73 a/c evaporator temperature circuit high
75 digital egr #1 solenoid error
76 digital egr #2 solenoid error
77 digital egr #3 solenoid error
79 vehicle speed sensor (vss) circuit signal high
80 vehicle speed sensor (vss) circuit signal low
81 brake input circuit fault
82 ignition control (IC) 3X signal error
85 prom error
86 analog/digital ecm error
87 eeprom error
99 power management
NOTES:
The above list can be used on most GM vehicles such as Buick, Pontiac, Oldsmobile, Chevrolet and some models of Cadillac. To make sure you have the right code and also fix it, please contact ATS.
posted by Rich at 10:02 PM
0 comments
![]()
![]()


